According to a recent “State of Online Retail Performance” report from Google, a one second delay in mobile load times of your eCommerce website can impact mobile conversions by up to 20%. Don’t panic! This article will provide you with the tools to test your existing Shopify site for speed, determine the fastest and easiest way to improve it and, as a result, keep those lost conversions.
Step 1. Test Your Site’s Current Speed
WebPageTest by Catchpoint allows you to test your Shopify site – or any site – using different:
- Desktop and mobile browsers
- Connection speeds
- Global locations
- And much more…
Step 2. Analyze Results
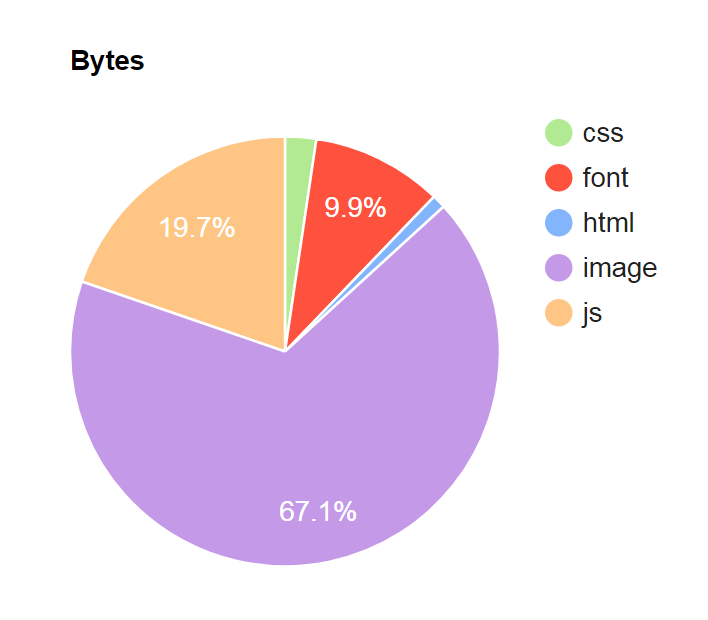
If your results look similar to these, there’s certainly room for improvement. For this article, we’re going to focus on improving your Shopify site’s speed by improving the way it loads and displays images.

Reviewing the “Content Breakdown” section of the results will show us exactly what’s slowing you down. Again, for the purpose of this article, images are slowing us down.
Step 3. Optimize Your Images
There are other ways to optimize your images but one of the fastest and easiest ways is to use a technique called “Lazy Loading”. Currently, your site loads images all at once during its initial page load. Lazy Loading will load your site’s images as the user scrolls down the page. For the user, this will result in much faster page loads; a win! For Google, Lazy Loaded images do not contribute to the initial page load resulting in improved search rankings (SEO) and faster traffic rankings; a win-win!
Step 4. How-To Add Lazy Loading to Your Shopify Theme
You’re not a programmer? No problem; neither am I. These instructions may look daunting but it really comes down to copy and pasting the right text in the right place. Before you begin, please make a backup of the Shopify theme you plan on editing.
If you truly want to invest the time into learning how to code in order to elevate your own site, you can utilize the best app to learn coding.-
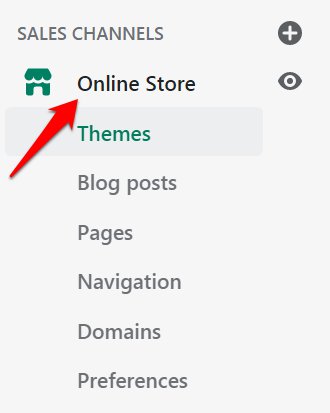
From your Shopify Admin home, click “Online Store”
-
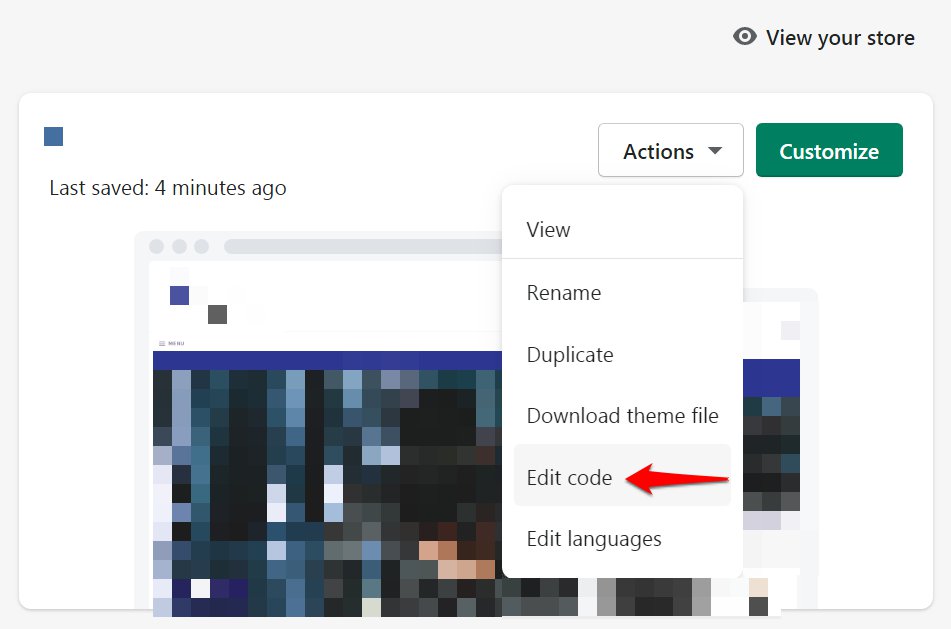
In the dropdown menu for your current theme, click “Edit Code”
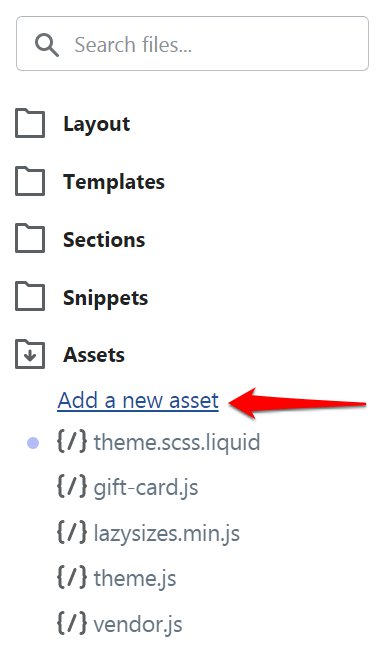
- From the file menu, expand “Assets”. If a file named “lazysizes.min.js” does not exist, we need to create one. (if it does exist, go ahead and skip to step 4)
-
Click “Add a new asset”
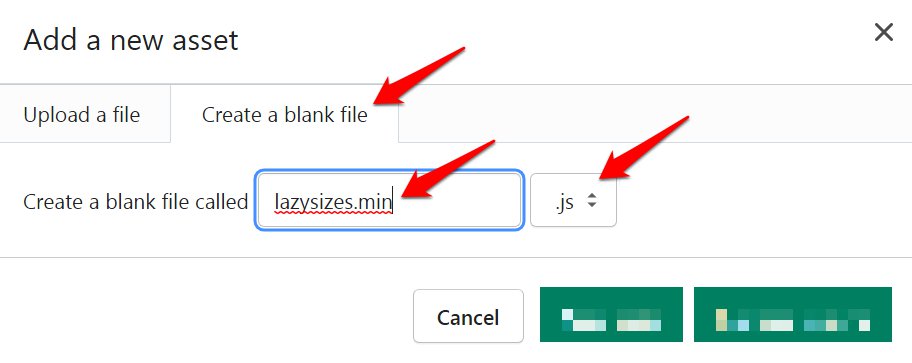
- Select “Create a blank file”
- Enter “lazysizes.min” and select “js” from the dropdown
-
Click “add asset”
- Click “lazysizes.min.js to edit
- Open this file, copy the contents and paste them into our new file.
- Click “Save”
-
Click “Add a new asset”
- From the file menu, expand “Layout” and click “theme.liquid”
-
Scroll down until you find the
</head>tag
-
In the line just above the
</head>tag, paste the following and click “Save”:
<!--Lazy Loading -->
{{ "lazysizes.min.js" | asset_url | script_tag }}
<style>.lazyload,.lazyloading{opacity:0}.lazyloaded{opacity:1;transition:opacity.3s}</style> - From the file menu, expand “Snippets”
-
Click on the file named “collection-grid-item.liquid”. Add the text “lazyload” after the text “featured-card__image” and click “Save”

-
Click on the file named “product-card.liquid”. Find the image tag, add “class=”lazyload”” and click “Save”

- From the file menu, expand “Sections”
- Click on the file named “featured-articles.liquid”. Add the text “lazyload” after the text “article-block__image” and click “Save”
- Click on the file named “featured-content.liquid”. Add the text “lazyload” after the text “featured-content” and click “Save”
- Click on the file named “featured-product.liquid”. Find the image tag, add “class=”lazyload”” and click “Save”
- Click on the file named “image-content.liquid”. Add the text “lazyload” after the text “image-content__image” and click “Save”
- Click on the file named “product-template.liquid”. Find the image tag, add “class=”lazyload”” and click “Save”
Step 5. Test, Review, Sell!
Go ahead and re-analyze your site using WebPageTest by Catchpoint. You should see some positive changes.

Now jump on over to your Shopify site and you’ll immediately notice your images loading different. Congrats! Not only will your customers notice but Google will as well. There are other ways to optimize your Shopify site that we will discuss in future Engage121 blog articles but this has been a great first step.
If at any time you need help or clarification with this process, Engage121 can help!
To read more tips and techniques from the staff at Engage121, please visit our blog here. For more information about our eCommerce Accelerator™ or to subscribe to our weekly digital marketing tips newsletter please sign-up here.
About the Author
As Engage121’s Senior Applications Developer, Michael brings 20+ years of creative and technical experience in design, programming and project management. When left unsupervised, he’s been known to leave some creative Easter eggs in our applications and marketing material.

